Jefferson Swivel and Secretary

Sunday, August 28, 2011

Making a Wagon Wheel

As I was making the Covered Wagon Bed I knew at some point I would have to either make the wagon wheels or buy them somewhere. I am a woodworker and buying them is about completely out of the question, so I tried my hand at making the four I needed. I do have to say just looking at pictures of them, it's not the easiest thing to make. I did find a free plan for making them at www.bobsplans.com but it was for a 14" wheel and I needed a 24" wheel so I had to do a little head scratching to get the size right.
 I started with four pieces cut at a 45 degree angle  then laid out the diameter I wanted, both the inside and outside.
 Cut out the inside diameter and marked the locations of the 8 spokes, then drilled the holes .
 I made flat tenons on the hub side and cut a strip of wood at 22 1/2 degree angles on opposite sides. Made a flat cut where the tenon will set flat on those pieces.
 Then cut the outside diameter of the wheel.  Made a dry fit run to see if all fit properly, so far so good. Then glued up the wheel in a certain order.
Turned four hubs that fit snugly and then glued them on. After the glue set I drilled holes in the hubs to accept the threaded rod, a washer and nut, put it all together and it all came out good. Now just have to make 3 more.

All went well and even though this isn't an authentic way to make to make wagon wheels, it works great for this wagon because they don't need to actually spin. They are basically just wheel looking legs, if that makes sense. 

Saturday, August 27, 2011

Covered Wagon Toddler Bed finished

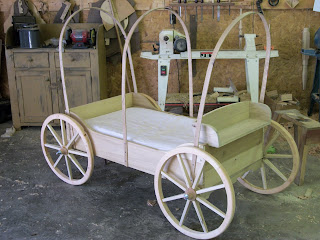
This is the Covered Wagon Bed I just finished for my almost 3 year old daughter, Lily.  I didn't have any plans for it so I just went off a picture I found online of a full sized one. I had to adjust it to fit her toddler mattress and make it low enough to the floor so she could get in and out easy enough. The little tool box on the front serves as a foot rest for her when she's sits on the buckboard and also houses diapers or could store a couple of blankets. From the look on her face in this picture I think she likes it. In fact, it was hard to get her crawl out of it after she discovered it. I would say thats a pretty good sign she'll enjoy her naps and bedtime.

Wednesday, August 17, 2011

Covered Wagon Bed

    Now that I am caught up for a week I have to try and get this bed knocked out. It's a bed for my 2 year old daughter, Lily. My wife came to me and said Lily needed a new bed. She is at the age where she's ready to start crawling out and we don't want her to climb out of the crib thats off the ground 3 or 4 feet, so I thought, what would be a good bed that would be unique at the same time and after a few weeks of looking online, I thought, I've never seen a covered wagon bed (light bulb). I looked online for ideas and all I could find were pictures of old wagons and ones people had restored. I needed it to fit her toddler mattress and being that she like us to drape blankets over her crib at night and call it her "tent" I thought this would be perfect. I began with a dovetailed box that will fit her mattress and just went from there. Being that I had several oak logs, I split out the bows that will have the canvas covering them and steam bent them around one of the wheel rims. It worked perfectly. Today I got the wheel hubs and and spokes made and hopefully tomorrow I can get the wheels all put together. This is a very fun and at times a real head scratcher but fun project. I'll post more pictures of the process as I get further along.

Sunday, August 7, 2011

Hand-cutting a Dovetail Drawer Parts 1& 2


        Here is a video on cutting all the dovetails in a drawer. It goes through all the steps I use to make a  complete drawer with hand tools only (except cutting stock to length and width), from layout to cutting and chopping to using a Stanley #45 hand plane to cut the grooves in the drawer front and sides, plus chamfering the solid wood drawer bottom with a rabbeting plane.

Monday, August 1, 2011

Carving a Knuckle for a Windsor Chair


Here is a video of how I go about carving the knuckles for my Nantucket Fan Back arm chairs. I have never been taught how to do this and don't know if it's right but it works for me and it's the only way I know how to do it. It takes some time to figure out and get, but it makes the arms of a chair have an added detail that I think looks amazing. Hope you enjoy the video.