I have to make about 40 or so of these and by the time I'm close to the end I'll be able to turn one in about 10 minutes. Repetition is what normally drives me in the opposite direction while building furniture, but for chairs, I get so much joy from seeing the next one look better that I am kinda disappointed when I've done the last set of legs.
Jefferson Swivel and Secretary

Showing posts with label Logs. Show all posts
Showing posts with label Logs. Show all posts
Tuesday, January 22, 2013
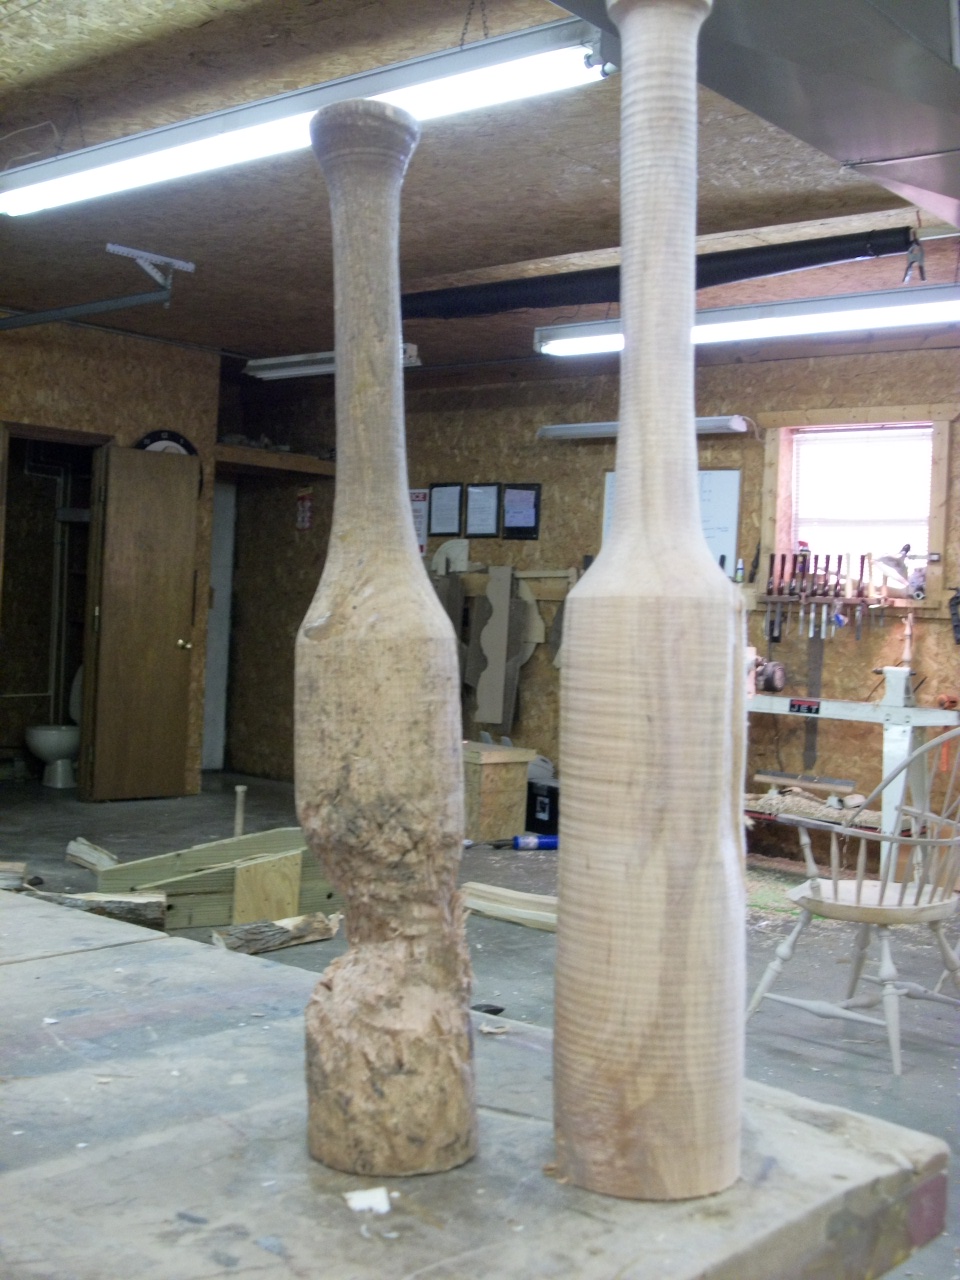
Chair Leg Splitting/Turning
I have to make about 40 or so of these and by the time I'm close to the end I'll be able to turn one in about 10 minutes. Repetition is what normally drives me in the opposite direction while building furniture, but for chairs, I get so much joy from seeing the next one look better that I am kinda disappointed when I've done the last set of legs.
Friday, January 18, 2013
Back to the process of...FUN

After some time away from chair building, I am finally getting my mojo back. To me there isn't much that is more rewarding than starting with a log to build a chair. The process you have to go through and all the drying time is so worth it in the end, to result in a piece of furniture that will outlast my daughters kids. I'm not sure what is more special to me, the fact that I made something that will be enjoyed way beyond my time or, to have someone in a 100 years at least know I was on this earth as a chair builder.


Out of one 24" section I got around 14-16 usable blanks for legs plus more than enough arm stumps.

Next I'll take them into the shop and turn them to a 2 1/4" diameter round. After I turn them round I let them sit around the shop for a few days to harden up before I'll turn them to shape.
Sunday, March 25, 2012
Making a Split Rail Fence
Well it's been almost a month since my last post and that about sums up how furniture making has been going. Pretty dead right now, but it was time for me to get back on the horse and write about something hand work related. This time I'm splitting out rails for the split rail or snake rail fence I'm putting around my better halves garden. I only had one log today but plan on getting a couple more to complete a 5 rail high fence.
 Here is the first log. About 15" dia. at the small end and its 9 foot long or so. I go through the splitting process like that on any other for the most part.
 I begin by first splitting the log in half. One thing I've noticed is it's way more difficult to split long pieces. I usually split out 5 foot long sections at the max, and at just over 9 foot, this log took some muscle and quite a bit more gusto from me than it normally does.

 Then each quarter is split into half again making 1/8ths. The smaller the log gets the easier it is to split. I used a wedge to get the split started then turn to the trusty ol' froe to help the rest of the way. By using the wedge to hold the split open as I move along, I can then remove the froe and hop over the wedge and continue the split. Out of each 1/8th of a section I split out two more pieces.
 This is the rails ready for use in the fence.


After about 2 hours of splitting I had the whole log split up into about 23 rails and was ready to get the fence started. Here you can see the fence in it's "Civil War-ish" look. Hopefully after 6-8 months it will grey up to that Civil War fence grey and look pretty good.

The garden with a partial fence. I plan to cut an opening for a gate but want to get all the rails split out and in place to see where the best location for it will be. I'm planning on driving 2 split posts into the ground and running the rails into mortises in the posts. Now on to get a couple more logs and complete the whole fence, or maybe after a little nap.


After the initial split, I split each half again making quarters.


Checking the look and finding out that I need 2 more logs.

After about 2 hours of splitting I had the whole log split up into about 23 rails and was ready to get the fence started. Here you can see the fence in it's "Civil War-ish" look. Hopefully after 6-8 months it will grey up to that Civil War fence grey and look pretty good.

The garden with a partial fence. I plan to cut an opening for a gate but want to get all the rails split out and in place to see where the best location for it will be. I'm planning on driving 2 split posts into the ground and running the rails into mortises in the posts. Now on to get a couple more logs and complete the whole fence, or maybe after a little nap.
Sunday, January 22, 2012
Mini Log Cabins of the Frontier

I've always loved the look of those old, square log cabins you see that were built in the pioneer days, and actually earlier than that. Some are still standing, some falling down and more importantly some being brought back to life and lived in again.
So with an idea for a mini sized version, I've started making these miniature sized Log Cabins. From what I've been told, German fathers would actually make these to give to a son as sort of a good luck charm and to bring peace and prosperity to him and his new bride. I don't know if that's true, but its kind of a cool story.

I started making these based just off of pictures I've seen of old ones still standing. The logs I "hand hewn" with a drawknife and each shingle is applied one at a time. I put in some chinking compound a little paint/stain and wallah, I have a fairly authentic looking mini log cabin. I've kinda got the bug from making these. It's almost a sky's the limit as what you an do, and you can go as primitive as you want. I would love to someday, either find an old one still standing and move it to my land or build one from scratch, but until then this is going to have to satisfy. Hey, maybe it could serve as a blue print for one I someday plan to build, and that alone is worth the time involved to make these.
Friday, January 13, 2012
Shaping a Windsor Chair Spindle
After browsing over my past videos uploaded to YouTube, I watched the one on Spindle Making. While I'm never happy with the way most of my videos come out, that video I am defiantly not happy with. It shows basically nothing but a "buffoon" hacking away at a stick of red oak. I didn't speak one word as to what I was doing or how I got to that particular point in the process. It's just a close up of me trying my best to make a video on a subject I thought I knew something about.
So with spindles to make for the chairs I'm making now, I thought this is a good time to redo a spindle video. Maybe I can give someone wanting to make a Windsor, a little more detail on how to shape them than I had when I first started. I'm going to leave the old spindle video up and let you all comment on which one gives more info on the process and helps you make a spindle. I'm pretty sure which one it'll be but I'll let you tell me in your own words. Who knows I may have to make another with better ideas from you.
Steam Bending Windsor Chair Parts
I'm working on another chair order and need to steam bend the bows for 4 sack backs. I thought it might be helpful to show how I go about the process for those wanting to make a Windsor. In this video, I'm starting with the already shaped pieces ready to bend.
I began by riving out the bows to roughly 1" x 1" x 48". After shaping them with a draw knife and spokeshave at the shaving horse to their pre-steamed sizes, they're ready for bending. I'm self taught at this and never learned how most chair makers go about it, so I don't move the bends from a bending form to a cooling form. I tie off the bent bows and hang them on the wall to cool. I have never had any problems doing it this way and it saves not only material for more jigs, but also a ton of space in the shop. Hope this video gives someone out there a little more encouragement to dive into Windsor Chair making. Steam bending can be used for several aspects in woodworking and it's also pretty cool just to watch happen in front of you.
Thursday, January 12, 2012
New Year...New Froe Club

I was splitting out some spindles for some chairs today and after a few hard whacks my froe club broke in two. I made the broken one back in June 2011 out of hard maple. I know the date because I wrote it on the one I was replacing the now broken one with. I am trying to find what woods work best for a froe club that I have on hand. Red Oak, White Oak, Hard Maple, and Walnut are the spieces I use for chairs most often and almost always have at my disposal. I would like to find a piece of Dogwood but haven't had the luxury yet for it to be placed in front of me to try. I am writing the date I retire the old broken one so I can see how long the next one will last.

So after using the red oak one for about a year and getting a pretty good amount of use out of it, now the maple one has only gone about 7 months. I am trying out a white oak club. Here is a short video on how I go about making my clubs. This is roughly the size I start all the clubs I've made with 4" sq and 17" long. It works great for me and I love the balance this size gives.
Wednesday, October 5, 2011
The Life of a Windsor Chair Spindle

When you look at a Windsor Chair in it's completed form, there are so many parts that come together to make the beauty you see. Part of that beauty are the plain and simple back spindles providing the anchor of the upper half of the chair. What you don't see is how those plain and simple little back spindles came to be. To do them the right way they need to be split or riven out of a green log. First you have to find a good straight log (in this case White Oak). You have to saw it to length, split it in half, then again into quarters, and even if you can read the bark well, the log may have some hidden defects that make it unusable. Once it's split into quarters, and any defects discovered and discarded, a grid is layed out across the section, some people split it into eight sections instead. The 1" grid gives you more even squared up spindles stock making it easier to shave with the Draw Knife in my book.

Each grid line is strategically rived using a riving brake, giving gorgeous straight grained oak providing the utmost strength and quality. Then each wide plank is rived again and again till 1" square billets are produced.


With each billet split out, it's time to shape them square with a draw knife. First you have to follow the grain on one side, flatten it out, turn it end for end, up and down, back and forth, then move onto the next side and do it all again. Once thats done four times, you have to make it octaganal and oversize the tenons, the swell, and taper. After you have all that done...

They need to set around the shop a week or so before they go in the kiln for 2-3 days. Then they are ready to final shape with a spokeshave.
So, those plain and simple little spindles have been through so much just to be a plain and simple spindle. Even if they seem like plain and simple parts of a Windsor, they provide the backbone of the chair allowing you to sit and rest your back. Now I'm ready to lean my tired back against those plain and simple spindles and relax.
Thursday, September 29, 2011
Splitting (riving) Hard Maple for Chair Parts

As I began a new and rather large chair order this week, 10 to be exact. I went through the maple logs I had gotten 3 or 4 months ago and they just weren't up to par. So I had to search out another nice maple, (hard to find in Missouri by the way) that could get enough parts for all 10 chairs and extra if needed. I found this beauty at my local log guy. It was about 20" in diameter one way and 17" the other and 9 foot long or so. It was really nice and straight and just had one little blemish on the bark. So I bought it got it home and began cutting it to rough length. This is how I laid out my blanks.
Instead of the "normal" way of splitting it into 1/8ths I tried basically making it a large checker board. I drew lines first across the center as normal and then again across the other way making 1/4's, then instead of drawing lines into 1/8th's I decided to lay it out every 2-1/2" from those first two lines, it gave me what you see in this picture.


I did have a few that were unusable, mostly the 4 that were dead center and a couple around the outside, but this photo shows, out of just one of the sections I cut to 24" long, it got me about 30 billets and just had 4 or 5 that are going to be firewood this winter. I'll have to make sure all goes well with this method, and if so, I believe I'll be using it permanently. Now to rough turn them all round and begin making chair parts.
Wednesday, August 17, 2011
Covered Wagon Bed

Wednesday, July 27, 2011
Windsor DVD
Here is a promo to my DVD on making a Bow Back Windsor. I use a few new techniques now but this is basically how it's done. There are a few things I left out on the DVD because it was intended to be given to students taking my chair class as a warm up for what to expect and what they need to kind of familiarize themselves with before coming to the class. The DVD is about 30 minutes long and is available on my web site for purchase.
Tuesday, July 26, 2011
Beaten to death

There are times when you know you have to get a new tool. When one is broken, worn out, or not doing the job needed. Well this is one of those times. Here you can see my old beaten froe club, it's only a little over a year old but it has just about reached the end of the road. I made a new one out of maple thinking it will hold up a little better but that is yet to be seen. The "beaten" one is red oak and could probably last another few months but I had time and a piece of maple to make the new so I thought what the hell. It's a bit taller and a bit fatter and the weight is considerably more ,it's fresh from a log, I put the date I "retired" the old one to see how long the maple one will last. If I can get a piece of dogwood I would make one out of it, as dogwood doesn't split. I hear it will out last just about anything you can make a club with.
Thursday, June 16, 2011
The Log Fairy

Monday, June 13, 2011
Logs and my Kiln

This is part of the log selection I just got that has 2 Red Oaks, 2 White Oaks, and 11 Maples. I need to cull the maple out as there aren't many clear sections but I should be able to cut off several chuncks for leg turnings and the rest will go to the firewood pile for this winter and next.

I cut a hunk off one of the maples and was able to get about 8 turning blanks that will work for legs. Here I just got finished turning these Bamboo legs and now the tenons are drying in the homemade kiln. The kiln is nothing more than a plywood box with two 100 watt light bulbs inside. In 3-5 days the tenons will be ready to final shape and go into a chair.

Subscribe to:
Posts (Atom)